Guitar Picking Lesson for Beginners
There are two main guitar picking strokes:
Downstroke
The plectrum strokes a string or strings only when it moves downwards. Notes played with this stroke are more potent (having greater 'attack' or 'weight').
Alternate Picking
The plectrum strokes the string(s) as it moves downwards and upwards in an alternating fashion. This stroke is more preferable when you need to play fast passages, because you can significantly increase the speed when playing two notes per picking circle.
This article's primary focus is the downstroke technique.
Use your wrist to create the guitar picking motion, not your fingers as you might expect:
I deliberately made broad picking strokes for better visualization; you don't have to go this far with your pick to make a string ring.
You can also add your arm and forearm to the motion if it feels more comfortable for you. The thumb and the index finger holding the pick must not move; I'll say it again, the fingers do not create the picking motion.
Using your fingers to move the pick might seem like an easier way to play at first, but it will only limit your speed and accuracy in the long run.
Downstroke Technique
Now let's focus solely on the simple downstroke technique. Mastering this technique will enable you to play really cool stuff in the very near future.
This lesson assumes that you already know how to hold the guitar pick properly. If you don't, take your time and read the 'How to Hold a Pick' article so that things will flow correctly from the start.
It's important to learn to play rhythmically and accurately. You can use a metronome or any drum track to support your playing by synchronizing it with a beat.
If you do not have a metronome, follow this link to get free metronome software for your computer, or use these online drum tracks:
Online Drum Tracks
Track 1
* BPM stands for Beats Per Minute
Track 2
OK, now when you're ready, let's make some sounds.
Exercise 1
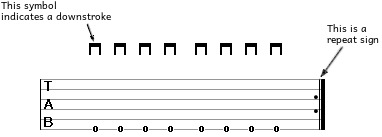
All you have to do here is pick the low E string with the downward motion. Accuracy is paramount; watch how my picking is in sync with the beat and practice to achieve that synchronization:
Each new note you play in this exercise should be a clone of the previous one, with about the same volume.
When you start to feel comfortable, try to minimize your movements; the plectrum does not have to go far away from the string after the stroke to make it sound. The less distance you go, the quicker you'll be able to play when necessary.
After you're doing well on the low E string, play it on the other strings as well.
Exercise 2
This exercise sounds more like a riff. Now it's time to add your fretting hand to the action.

The numbers at the fingering line in the tab show you which fingers I recommend using to press the strings with your fretting hand. The 1st is the index, 2nd is the middle, 3rd is the ring, and 4th is the pinky finger.
In the video, I have doubled my speed. You don't have to do this right now. Go quicker only when you manage to play accurately and confidently at a slower tempo.
Now let's hit a couple of strings simultaneously.
Before moving on to the next exercise, which consists of simple power chords, let's play the E power chord (E5) separately. To do this, strike the low E string open and the A string at the 2nd fret.

In the beginning of this video, I deliberately hit the strings very slowly to clearly illustrate the motion for you. In reality, though, it takes less than a fraction of a second to move the plectrum from one string to another, so the sounds from these two strings become solid (as from the 4th second in the video).
Exercise 3 - Getting Some Music!
Now let's create a simple guitar riff using the E power chord that you just learned to play. In the next step, you will also learn to play the G power chord.
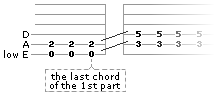
Play simultaneously the low E string at the 3rd fret, and the A string at the 5th fret 8 times (the G power chord), then switch to the E power chord and play it 8 times as well. Repeat this progression a few times.
Here's the guitar tab:
Listen to what you should get:
While practicing over this riff polish the smooth transition between the two chords. The transition should take the minimum amount of time, and the chords should be in sync with the beat.
You can make this riff sound more interesting by adding the following part after its end:
The extended riff will sound like this:
Reducing undesirable noise
When switching from the first part of the riff to its extending part:
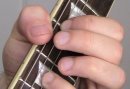
we need to cross over from the lower E and A strings to the A and D strings. But still ringing the open low E string after the last chord (from the first part) will interfere and make undesirable noise. The easiest way to mute the low E string in this situation is to slightly touch it with your thumb of the fretting hand, as I did in the following picture:
Moreover, you can also prevent the noise caused by accidental picking through the unused nearby strings by merely touching them with any part of your available finger(s).
For instance, in the picture below, I play the riff on the A and the D strings. I mute the adjacent G string with the side of the pinky finger, which at the same time presses the D string, and the lower E string with the unoccupied middle finger.

That's it for this lesson!
Final Thoughts
Right now it might seem that getting the picking and fretting hand work together is difficult; both of your hands feel out of control and do not want to listen to you.
Pause for a moment, relax your hands, and after that switch to a slower tempo you feel comfortable with and practice some more.
It will take some time for your hands to get in sync, after that though, you won't even think about how and where to pick, the hands will work on autopilot.