Alternative Rock and Metal Guitar Riffs for Beginners – Lesson 1
Here I'm going to show you how to play easy alt-rock, punk and heavy metal guitar riffs for beginners using only the simple downstroke picking techniques from the previous lesson.
The main goal of this lesson is:
- To get used to the various rhythmic figures - combinations of picking and pausing that create dynamic interesting sounds, played just on a single power chord.
- Next to play the rhythmic figures on the power chord progressions. Here is where the riffs will be formed.
- And finally to practice the new riffs, achieving solid playing without stumbling.
Rhythmic Figure 1

Note that my tabs do not contain information about how long notes and pauses are, it makes them look more compact and neat, without too much notations on it, just listen to my audio/video examples a few times, get the rhythm in your head, fire up the drum track or a metronome and here we go.
And by the way, if you still don't know how to get a cool sound out of your guitar setup check out the Getting the Right Sound article.
Feel free to accent some of the chords or put small pauses between them, it can dramatically change the "feel" of a figure.
In order to accent a certain chord, pick the strings harder than with the rest of the chords. Accenting a first chord in a figure often sounds better.
In this figure I make some pauses between the 2-3 and 4-5 chord by muting the 2 and 4 chord on their ends. This creates the feeling of "action" or "musical intensity". Look at the chart below to get the idea:

To silence a sounding chord and make a pause, slightly touch the strings with the side of the palm of your picking hand somewhere near the bridge.
Now listen to absolutely the same pattern I played without pausing:

Now you see how much this simple trick of pausing can make the riffs sound completely different.
When you manage to play the rhythmic figure accurately over a single power chord, let's move on and play it over chord progressions:
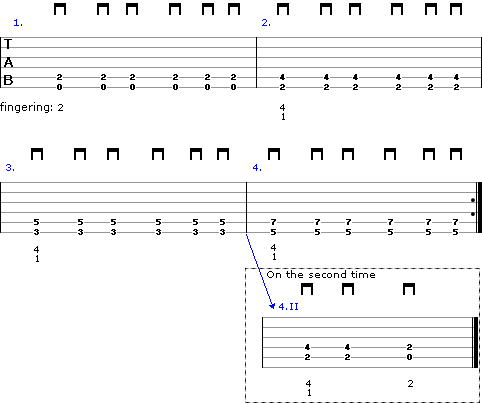
Riff 1

First time play the riff from the 1st to the 4th ordered bars.
On the repetition, after playing the 3rd bar, jump to the second version of the 4th bar (4.II in the dashed rectangle).
Riff 2

Note that In this riff I didn't pause between the notes.

When you need to press two adjacent strings at the same fret, it's often more comfortable to bent the nearby finger in a way that its pad lays down across these strings, as in the picture, rather than use each finger for each string.
I used only the index finger to play the whole riff 2.
Riff 3
In the middle of this riff you'll transit your hands from one set of strings to another. Work thoroughly over the transition, begin in a very slow tempo.
What is important here is that no matter when you play slow or fast, practice to jump over the strings quickly, without stumbling.
The same advice goes for jumping from one fret to another on the same string. You should achieve a smooth, quick transition that will result in the solid, non-abrupt sound, unless of course, you need a sharp and abrupt playing on purpose.
If you have any difficulties with a certain part of any riff or song, you can achieve much faster improvements by cutting this part down and focusing your practice just on this hard part for some time, rather than running around the entire piece of music.

Rhythmic Figure 2

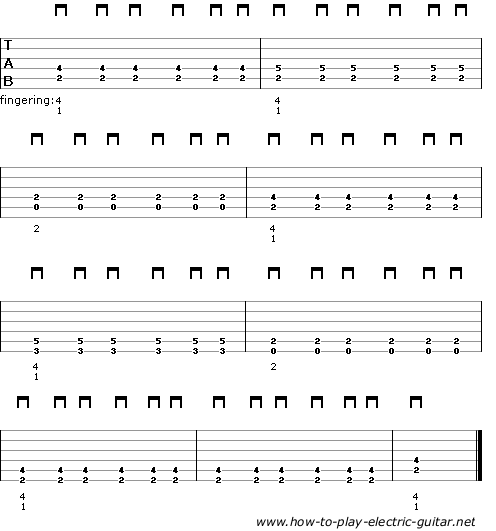
In this figure (except the ending) there is a pause between each couple of chords, the duration of the pause is equal of a one chord.
Between the last four chords there's no pausing, you play them one after another four times.
Here is an illustrative way to look at this:

First imagine playing 8 equal chords per each bar. Now you need to withdraw from the chords crossed by the red lines.
It will probably feel awkward playing this sequence at the beginning, but it is definitely worthwhile to master, listen to the riff 4 right below where I utilized this concept.
Riff 4
Not bad huh?

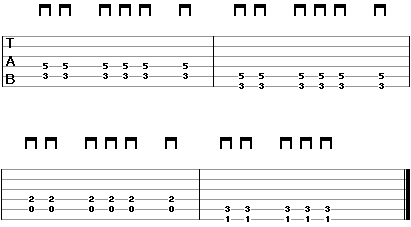
Rhythmic Figure 3

Riff 5

P.S.
This lesson is an entry to the alt-rock and metal riffs and phrasing.
In the next lesson, I'll give you a few extra guitar riffs for beginners that can be easily combined together like pieces of a Meccano construction set, and form a composition.
Moreover, I included a backing track to play along with, consisting of a drum and a bass line, so you'll have an experience in some way similar to playing in a band. Click here to move on to this lesson.
If you liked this lesson, look at the Pick Scrape Guitar Trick, you should like it too ;)
- Alt-Rock and Metal Guitar Riffs for Beginners (you are here)
- Turning a Few Riffs into a Composition
- Palm Mute Technique
- 12-Bar Blues
- Guitar Sliding Technique (Glissando)

