Guide to Guitar Chord Diagrams
Guitar chord diagrams are the simplest and most intuitive way to illustrate where to press the strings on the fingerboard to play a chord.
Chord diagrams are used in guitar chord charts, as well as in many songbooks and on web pages alongside lyrics, to help you focus on learning a song instead of looking up the chords elsewhere.
There are a couple of types of guitar chord diagrams:
|
1. vertically orientated
| 2. horizontally orientated
|

The only difference between them really is how they are positioned.
• The vertical orientation diagram is the most commonly used on the net.
The six vertical lines represent the strings. The low E, A, D, G, B, and high E strings are positioned from the left to the right in the chord box.
The horizontal lines are the frets on your fingerboard. The top line of the diagram is the guitar nut, and each subsequent line towards the bottom represents the 1st, 2nd, 3rd, etc., fret accordingly.
The horizontal and vertical lines create a simple visualization of the fingerboard.

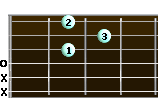
Now, as an example, let's use the diagram of the C major chord to illustrate how to interpret it and play this chord.

The circles in the diagram tell you where to press the strings with your fretting hand. The numbers in the circles are the recommended, comfortable fingering.
It means you press:
- the B string at the 1st fret with the 1st finger,
- the D string at the 2nd fret with the 2nd finger,
- and the A string at the 3rd fret with the 3rd finger.

When talking about guitar playing, the word "fret" can refer to both the space between two adjacent metal strips and the metal strip itself (the exact meaning is determined by the context).
So when you read "press the 5th string at the 3rd fret", it means you press the string against the fingerboard between the 2nd and 3rd metal strips.
Now let's talk about the symbols at the top line of the chord box that represent the guitar nut:

A "X" symbol says to avoid the string below it. You don't press and don't strum this string.
A "O" symbol indicates an open string. You don't press this string with your fretting hand, but you need to strike it with your strumming hand when playing a chord.
So in order to play the C major chord, you need to avoid strumming the low E string and strum only the open strings and the strings you're pressing with your fretting hand:
A → D → G → B → high E.
Another type of vertical guitar chord diagram you may find online is a very compact one:
C major chord:  32 1
               x32010
The top row is the fingering. The bottom is the frets you need to press.
• In the horizontally orientated chord diagrams, the horizontal lines are the strings, and the vertical are the frets.
Barre chord notation
Note: barre chords are also often called bar chords.
Barre is a way to press down on a few or all strings with one finger simultaneously by laying it down across these strings.

In guitar chord diagrams, a barre is illustrated as a flat or arched line across a few strings.
The number near this line shows on which fret you should press the barre. If there's no number, you count from the nut.
Here are a few different instances of bar chord diagrams:


Related Articles
- Easy-to-Play Chords - A Chart for Beginners
- Diagrams of Various Strumming Patterns
- Fingerstyle Patterns
- Chord Progressions (Including Chord Diagrams)
- A List of Songs That are Relatively Easy to Play
Virtual Phrasebook
🌍 Essential travel phrases in Spanish, Chinese & English — side by side. Click words to swap & build variations.
"No information overload — just essential phrases. Built for real travelers."
Suggestions? 💬 Help shape the next version — share your feedback or feature ideas.
C major chord: 32 1
x32010</div>
Would like to have this explained more!